If you had to make a list of the hand tools most coveted by woodworkers, rasp and files probably wouldn’t make the top ten. Hand planes, chisels, and dovetail saws are much “sexier.” However, when it comes to shaping and smoothing any curved or contoured part, you’d be hard pressed to find a more suitable tool. No other tool gives you the same combination of fast wood removal and subtle control. Rasps and files aren’t tools you use every day, but in certain situations, they’re invaluable.
 WHAT’S THE DIFFERENCE?
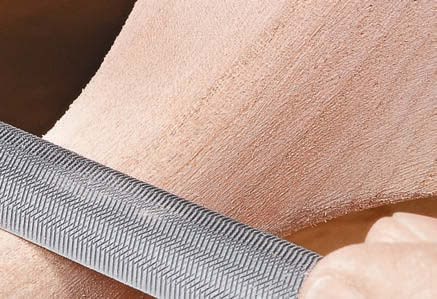
The difference between rasps and files is easy to understand. Files have low, tightly spaced cutting edges while rasps remove wood with individual, raised teeth (photo above). In practical terms, this means that rasps cut more aggressively and leave a rougher surface when compared to files. It’s also one reason why rasps and files are best used as a team. The rasp does the initial coarse shaping while the file follows behind to smooth and refine the surface. And unlike using a spokeshave or chisel for shaping, there’s little chance of gouging and no risk of tearout.

RASPS. First, let’s look at rasps. Rasps are designed to do the rough work. They come in a wide variety of shapes and sizes — from 6" to 14" long, in flat, half-round, or round shapes. One of the most common and useful shapes is the tapered half-round. One side is flat while the other is rounded. And the blade tapers slightly. This combination allows you to work both concave and convex surfaces and to get into tight spaces. You’ll also find that a round rasp can be handy for shaping tight, inside curves.
TYPES & TERMS. Rasps also come in several degrees of coarseness. The coarsest types are referred to as wood rasps. Next in line are the cabinet rasps. The smoothest cutting class get the name patternmaker’s rasps.
This terminology can often be confusing since there is no real standardization. All you need to remember is that the cut is determined by the size and spacing of the teeth. Large teeth spaced far apart will cut more aggressively and leave a rougher surface. I find that for all-around versatility, the smoother-cutting rasps will generally serve you better.
TOOTH SPACING. You’ll find that inexpensive rasps as well as the coarser grades are made with uniform rows of evenly spaced teeth. The teeth of pricier, finercutting rasps have randomly spaced teeth that are sometimes raised by hand (called stitching). This type is limited to the category of patternmaker’s rasps. The idea here is that the teeth are less likely to create and follow “furrows” during a stroke. The result is a smoother surface and a cut that’s easier to control.

FILES.
Files do the finesse work once the piece has been roughly shaped with the rasp. Due to the fact that the teeth are much lower and tightly spaced, files cut less aggressively and leave a surprisingly smooth surface. The effect is similar to sanding with a coarse- to medium-grit sandpaper. But I think a file is easier to manipulate and gives you better, more subtle control.

Files likewise come in all shapes. Again, I have a preference for the half-round shape. It’s essentially like having two files in one at your fingertips.

There are also different grades of coarseness. From roughest to smoothest, files are designated as bastard, second cut, and smooth.
The teeth of a file are generally oriented at an angle to the edges. This allows you to hold the file at a comfortable skew when working on a surface. A file with a single set of parallel teeth is appropriately referred to as single-cut. A doublecut file has two sets of opposing teeth. A double-cut file will remove wood faster, while a single-cut file leaves a slightly smoother surface. For use on wood, a double-cut file is your best bet.
TECHNIQUE. Learning to use rasps and files isn’t difficult. Once you give it a try, you’ll master the technique in short order.
For the best control, grip the tool with both hands — one on the handle or tang, the other near the tip, as shown in the left drawing below. (Adding handles to your files and rasps makes them a lot easier to manipulate.)
The tool is usually held skewed to the surface. The angle can depend on the surface you’re working — 45° is a good starting point. Depending on the goal, you can take strokes along the grain, slightly across the grain, or directly across the grain. As with any cutting operation, working with the grain will leave a smoother surface. When you want to remove wood fast, cutting across the grain is more efficient.
As I stated, the rasp does the initial shaping. Since a rasp takes a more aggressive bite, it requires more force behind it. Don’t be afraid to push it into the wood. od. When using a file to remove the marks left by the rasp, lighten up and let the weight of the tool do the work, especially in the later smoothing stages.

You’ll end up with a smoother surface if you cut downhill with the grain. And long strokes will help you achieve smooth, graceful contours. I use the flat face of the tool when working on outside curves and then switch to the rounded face for inside curves (lower right drawings).

A key to creating a pleasing contour is to work slowly and deliberately. Stop and check your progress often. Sometimes you can judge a surface better by feel than by sight, so use your fingers.
I find that on top of the high quality that can be achieved, shaping wood with rasps and files can be a relaxing, unhurried way to get the job done.


